Beginner's Guide to the Screens
Learn what the icons, cards and gauges mean in your first battles, then use a character's details screen to check their strengths and abilities.
On this page
Controls
You fight with up to 3 characters from a party of 6, and you win by defeating every enemy before the timer runs out. If time runs out, you lose regardless of your remaining health. In PvP, the player who dealt more damage wins instead.
| What you do | What happens |
|---|---|
| Tap an Arts Card | Attack with that card’s Arts. Tap several in a row to chain them into a combo. |
| Tap the screen up close | A Tap Attack, up to three in a row. |
| Tap the screen at mid range | A Tackle, which closes the gap. |
| Tap the screen from far away | A Tap Shot, a single Ki blast that keeps the enemy from moving freely. |
| Slide your finger | Move. Moving back costs a little Ki and Vanishing Gauge. |
| Flick up | Boost toward the enemy, or a Quick Dash from long range. Tap Shots can’t hit you during a Quick Dash. |
| Flick down | Step back. |
| Swipe left or right as an attack lands | Vanishing Step: dodge it. |
| Hold down on the screen | Charge Ki quickly. |
| Tap an ally’s icon | Switch to that character. During an enemy combo this is a Cover Change: the ally takes the hits instead. |
Tap Attacks, Tackles, Quick Attacks and Tap Shots cost no Ki and need no card. Cover Change can’t stop them.
If an attack shows a Danger Zone at your feet, a Vanishing Step won’t dodge it. Move out of the area instead.
The battle screen
Arts Cards
Your hand of cards sits at the bottom. Each card’s picture tells you what it does, and its Ki cost is printed on it.
| Card | Type | What it does |
|---|---|---|
 |
Strike | Rushes at the enemy for a melee hit. |
 |
Blast | Fires Ki blasts from where you stand. |
 |
Special Move | The character’s own big attack, such as a Kamehameha. |
 |
Special | An effect unique to the character. Read the card to see what it does. |
 |
Awakened | A special attack only some characters have. |
 |
Ultimate | Stronger than a Special Move. Some characters get this card from their Main Ability. |
Strike cards hit with the Strike stats and Blast cards with the Blast stats, so a character’s numbers tell you which cards will do more damage. A card’s Arts can also be Impact, Slice, Pierce or Explode, which only matters against resistances to those.
Gauges and buttons
Your Arts Cards spend Ki from the Ki Gauge. It refills over time. Hold down on the screen to charge it faster.
The Vanishing Gauge is spent on each Vanishing Step. It refills on its own (but not while you attack) and fills up at once when an enemy Arts attack hits you or when you switch characters. If the gauge is too low, you still sidestep but won’t dodge the attack.
The Ability Gauge fills on its own. When it’s full, tap your character’s icon to use their Main Ability, once per battle.
Some cards carry a Dragon Ball. Playing them fills your Dragon Ball slots, and with all 7 a button appears for a Rising Rush, a long combo attack.
When two equal attacks collide you get a Dokabaki Impact: tap fast to gain Ki and deal damage. Its damage can’t finish an enemy off, unless the collision was between Special Moves such as Kamehameha.
Some characters have an extra gauge of their own beside their icon, a Unique Gauge, a Synchro Gauge or an Active Gauge. Their details screen explains what fills it and what it does.
Elements
Every character has an Element, shown by its colour and icon. Attacking with the advantage deals more damage and with the disadvantage deals less.
| Element | Strong against | Weak against |
|---|---|---|
 RED |
YEL | BLU |
 YEL |
PUR | RED |
 PUR |
GRN | YEL |
 GRN |
BLU | PUR |
 BLU |
RED | GRN |
 DRK |
every colour above | LGT |
 LGT |
DRK | nothing |
The five colours go round in a circle: RED beats YEL, YEL beats PUR, PUR beats GRN, GRN beats BLU, BLU beats RED. No Element deals reduced damage against DRK.
The Superior and Reverse marks change these matchups. Look for these Element icons in ability text and on the details screen:
| Element | Superior | Reverse |
|---|---|---|
 RED |
 RED+ |
 Reverse RED |
 YEL |
 YEL+ |
 Reverse YEL |
 PUR |
 PUR+ |
 Reverse PUR |
 GRN |
 GRN+ |
 Reverse GRN |
 BLU |
 BLU+ |
 Reverse BLU |
A Superior Element (RED+, YEL+ and so on) deals even more damage when it has the advantage, but takes the same damage as a normal Element. Abilities and equipment conditions that name a colour also include its Superior version. DRK+ and LGT+ exist as well.
A Reverse mark next to the Element swaps its strengths and weaknesses, so a Reverse RED character is strong against BLU and weak against YEL. Reverse only affects the five colours, not DRK or LGT.
A character’s details
Rarity
The badge on a character’s tile shows their rarity. These are listed from lowest to highest:
| Badge | Rarity |
|---|---|
 |
HERO |
 |
EXTREME |
 |
SPARKING |
 |
ULTRA |
 |
LEGEND |
ULTRA characters also have an ULTRA Ability that works from the start of the battle. A  ribbon marks a LEGENDS LIMITED character, who only appears on limited summons.
Stars, Limit Break and Zenkai
You get a character, and make them stronger, by collecting their Z Power from summons and Scout Battles. 100 Z Power gets you the character. When you reach the next Z Power requirement, the character Limit Breaks and another star lights up. Limit Break happens on its own, and the details screen shows a character’s seven stars like this:
| Stars | Limit Break | Z Power |
|---|---|---|
 |
None yet | 100 |
 |
★3 | 700 |
 |
★7 | 3,000 |
 |
★3+ | 6,000 |
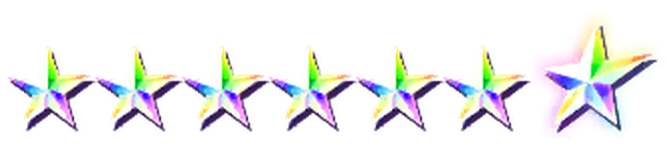 |
★7+ | 9,999 |
The star colours show your Limit Break progress:
 Grey stars show stars you haven’t earned yet.
 Yellow stars count ★1 to ★7, from 200 to 3,000 Z Power. The seventh is drawn bigger.
 Red stars come after ★7. They replace the yellow ones from the left, one at a time, as ★1+ to ★6+, every 1,000 Z Power from 4,000 to 9,000.
 Rainbow stars mean ★7+, the highest Limit Break, at 9,999 Z Power. All seven turn rainbow at once.
Z Abilities, the party-wide boosts every character has, get stronger at ★3, ★6 and ★7+.
Some characters can go further with Zenkai Awakening  . Once they’re at ★7, collecting their Awakening Z Power raises them to Awakening Rank I, which upgrades their stats, Arts and abilities and adds a Zenkai Ability. The rank goes up to VII.
Battle Style
Each character has one of four Battle Styles: Melee (strong up close), Ranged (strong at a distance), Defense (hard to bring down) and Support (buffs allies and weakens enemies).
Tags, Episodes and Traits
A character’s Tags (such as Saiyan or Lineage of Evil) and Episode (such as Saiyan Saga (Z)) determine which abilities and equipment affect them. Check these when choosing characters for your party. Ability text marks them with small icons:
| Icon | Means | Example in ability text |
|---|---|---|
 |
A Tag | “Tag: Lineage of Evil” |
 |
A character | “Character: Goku” |
 |
An Episode | “Episode: Saiyan Saga (Z)” |
Traits, at the top of the details screen, are short descriptions of what a character is good at. Unlike Tags, no ability targets them.
Tag and transforming characters
A  mark on a tile is a Tag Character: two characters fighting as one, swapping with a Switch button. They share health and effects, and if they’re defeated both count as defeated. A
 mark means the character changes form during battle.
Reading ability text
When an ability doesn’t say who it affects, it affects the character using it. “On Hit: Damage +10%” means the attacker’s own damage goes up when the attack lands. Damage listed for a Special Move or Ultimate without a target goes to the enemy.
When ability text names a kind of Arts Card, it draws the card as a small icon:  Strike,
 Blast,
 Special Move,
 Special,
 Awakened and
 Ultimate.
Effects either help or hinder a character. Attribute Upgrades and Buff Effects help a character, such as Damage +10% or Ki Protection. Attribute Downgrades and Abnormal Conditions hurt one, such as Damage Sustained +10%, or Faint, Poison and Bleed. While one is active, a status icon shows on the character. Abnormal Conditions end on their own after a set number of counts.
“Sustained Damage Cut” and “Damage Guard” are two names for the same thing: less damage taken. Status Icons lists every icon.
Next steps
Your First Party walks you through the free starter parties, and Free Characters lists the characters you can earn without summoning. Story, Energy and Daily Play covers what to do each day. When an icon on a character puzzles you, look it up in Status Icons, and Battle Mechanics explains the rules behind ability text such as Endurance and Damage Guard. Building a Team covers the party, Arts Boost and equipment.
Browse the characters by Element or Tag to find ones that boost each other, then look at the equipment their Tags can use. Supporters add another boost in most modes, except Ultra Space-Time Rush, Full Power Battle, Tournament of Power and Guild Battle.
Last updated on 10/30/2026